
What is the Secret of Crème Brûlée? Unlocking the Perfect Dessert
Crème brûlée is the dessert that whispers elegance in every spoonful. From the moment you crack through its caramelized sugar crust to the creamy custard beneath, it feels like pure magic. But what makes this classic French dessert so irresistible? And more importantly, what’s the secret of crème brûlée to perfecting it at home?
In this article, we’re going to uncover every detail about crème brûlée. Whether you’re making it for the first time or want to refine your technique, this guide will help you master the art of this iconic dessert. 🍮✨
Introduction to Crème Brûlée: A Dessert of Elegance
Crème brûlée, which translates to “burnt cream” in French, is more than a dessert; it’s an experience. The secret of crème brûlée lies in its perfect balance of textures—a silky, creamy custard base topped with a crisp, caramelized sugar layer.
A Brief History of Crème Brûlée
Crème brûlée dates back centuries, with its first appearance in French cookbooks during the 17th century. The dessert’s origin is still debated, but its secret of enduring appeal lies in its simplicity and sophistication. Similar custard-based desserts, such as the Spanish “crema catalana” and the British “Trinity cream,” share its heritage.
What Makes Crème Brûlée So Irresistible?
The real secret of crème brûlée is in its contrasting textures and flavors. The creamy custard, lightly infused with vanilla, melts in your mouth, while the caramelized sugar layer adds a delightful crunch.
But achieving the perfect crème brûlée at home requires mastering a few essential techniques.
The Secret of Crème Brûlée: Tips for Perfection
- Use Quality Ingredients
The secret of crème brûlée starts with the basics: fresh cream, high-quality vanilla beans, and fresh eggs. These elevate the flavor of your custard. - Master the Water Bath Technique
Baking crème brûlée in a water bath ensures gentle, even cooking. This is a crucial step in unlocking the secret of crème brûlée’s smooth texture. - Perfect the Caramelized Top
Use a kitchen torch to caramelize sugar evenly. This creates the signature crispy top layer that’s key to the secret of crème brûlée’s appeal.
Common Mistakes to Avoid When Making Crème Brûlée
- Overcooking the Custard: This can lead to a grainy texture. The secret of crème brûlée is a custard that’s just set but still jiggles slightly in the center.
- Using Too Much Sugar for Caramelization: A thin, even layer of sugar ensures the perfect crunch without overpowering the custard.
Conclusion: The True Secret of Crème Brûlée
The secret of crème brûlée isn’t just in its recipe—it’s in the attention to detail at every step. From selecting quality ingredients to mastering the caramelization process, every element contributes to creating this iconic dessert.
With practice and care, you can recreate the magic of crème brûlée in your own kitchen. So go ahead, crack into that caramelized sugar top, and savor the elegance of this timeless dessert. 🍮✨
“Crème brûlée is proof that sometimes, the simplest ingredients create the most luxurious results.” ✨
Why Crème Brûlée Captures the Hearts of Dessert Lovers
What makes crème brûlée so special? It’s the balance of textures and flavors. The crunchy, golden sugar crust contrasts beautifully with the velvety smooth custard beneath. The subtle sweetness, combined with the richness of cream and the warmth of vanilla, creates a dessert that feels indulgent yet comforting.
Plus, there’s something thrilling about cracking into that sugar layer. It’s like opening a present, except the gift is pure deliciousness. Who wouldn’t love that?
Understanding the Elements of Crème Brûlée
The Role of the Custard: Creaminess Defined
The custard is the heart of crème brûlée. Made with cream, egg yolks, sugar, and vanilla, it’s simple yet decadent. The secret lies in the texture—it should be rich and creamy, without any lumps or curdling. A properly baked custard jiggles slightly when you shake it, like a gentle wave.
The Sugar Crust: A Delightful Crackling Top
Ah, the sugar crust. It’s not just for aesthetics—it’s what transforms crème brûlée from a custard to a culinary masterpiece. The sugar topping is sprinkled evenly and then caramelized using a kitchen torch or broiler. The result? A golden, glass-like layer that adds a satisfying crunch to every bite.
The Secret Ingredients for Perfect Crème Brûlée
The ingredients for crème brûlée are surprisingly simple, but quality matters. Here’s what you’ll need:
| Ingredient | Quantity |
|---|---|
| Heavy Cream | 2 cups |
| Granulated Sugar | 1/2 cup (plus 2 tbsp for topping) |
| Egg Yolks | 4 large |
| Vanilla Bean or Extract | 1 pod or 1 tsp |
Choosing the Right Cream and Vanilla
The cream is the base of the custard, so it must be rich and fresh. Heavy cream is ideal for achieving that luxurious texture. As for the vanilla, use a real vanilla bean if possible—it adds a depth of flavor that extract can’t match. Simply split the bean, scrape out the seeds, and add them to the cream for maximum flavor.
“Vanilla is the soul of crème brûlée. Choose wisely, and your custard will sing!” 🎵
The Importance of Fresh Egg Yolks
Egg yolks are the thickening agent for the custard. Always use fresh, high-quality eggs for the best results. Fresh yolks are bright and firm, ensuring your custard sets perfectly.
Sugar Matters: Granulated vs. Superfine Sugar
For the sugar crust, superfine sugar is often preferred because it melts more evenly. However, regular granulated sugar works just fine, as long as you apply it in a thin, even layer.
Tools You Need to Make Crème Brûlée Like a Pro
Ramekins: Choosing the Right Dish
Ramekins are the unsung heroes of crème brûlée. These small, heat-resistant dishes allow the custard to bake evenly. Choose ramekins that are about 4–5 ounces in size for individual portions. If you’re serving a crowd, a larger baking dish works too, but individual servings feel more elegant.
Torches vs. Broilers: Which One Creates the Best Sugar Crust?
Here’s the million-dollar question: Should you use a kitchen torch or your oven’s broiler to caramelize the sugar? Both work, but torches give you more control. You can focus the heat exactly where you want it, avoiding burnt spots. If you don’t have a torch, a broiler is a great alternative—just keep a close eye on your ramekins.
“Think of the torch as your magic wand. A few sweeps, and you’ve created dessert alchemy!” 🪄
Nutrition Facts
Curious about the nutritional content of your crème brûlée? Here’s a quick breakdown per serving:
| Nutrient | Amount |
|---|---|
| Calories | 250 |
| Fat | 20g |
| Protein | 4g |
| Carbohydrates | 15g |
In the next part, we’ll dive into the step-by-step process of making crème brûlée, along with pro tips to avoid common mistakes. Stay tuned for the most satisfying dessert-making experience of your life! 🍮
Step-by-Step Guide to Crafting Crème Brûlée
Now that we’ve covered the history, key ingredients, and essential tools, it’s time to dive into the fun part—making crème brûlée! Don’t worry; it’s easier than it looks. Follow these steps, and you’ll have a dessert that’s both Instagram-worthy and delicious. Let’s get started! 🍮✨
Preparing the Custard: Mixing and Heating
The custard is the heart of crème brûlée, so getting it right is crucial. Here’s how you prepare it:
- Heat the cream: In a medium saucepan, pour the heavy cream and add the seeds of a vanilla bean or vanilla extract. Heat the mixture over medium-low heat until it’s warm but not boiling. If you see small bubbles forming at the edges, it’s ready.
- Whisk the yolks and sugar: While the cream heats, whisk together the egg yolks and sugar in a large mixing bowl. Whisk vigorously until the mixture becomes pale and creamy—this step ensures a smooth custard.
- Temper the eggs: Slowly pour the warm cream into the egg mixture, whisking constantly. This step, called tempering, prevents the eggs from scrambling. Take your time here; slow and steady wins the race.
- Strain the mixture: Pour the custard through a fine mesh strainer to remove any lumps or vanilla bean fragments. This ensures your custard is silky smooth.
Pro Tip: “Think of tempering like teaching your eggs to relax—they need a gentle introduction to heat!” 🍳
Baking with Precision: The Water Bath Method
The secret to perfectly cooked custard lies in baking it gently and evenly. Here’s how to do it:
- Preheat your oven: Set your oven to 325°F (160°C). Place your ramekins in a deep baking dish or roasting pan.
- Fill the ramekins: Divide the custard mixture evenly among the ramekins, leaving a bit of space at the top.
- Add hot water: Pour hot water into the baking dish, filling it until it reaches halfway up the sides of the ramekins. This water bath, or bain-marie, ensures gentle, even cooking.
- Bake: Carefully place the baking dish in the oven and bake for 35–40 minutes. The custard is done when it’s set around the edges but still slightly jiggly in the center.
- Cool: Remove the ramekins from the water bath and let them cool to room temperature. Then cover them with plastic wrap and refrigerate for at least 4 hours, or overnight, to allow the custard to set completely.
“The water bath is like a warm hug for your custard—it keeps everything smooth and happy!” 💦
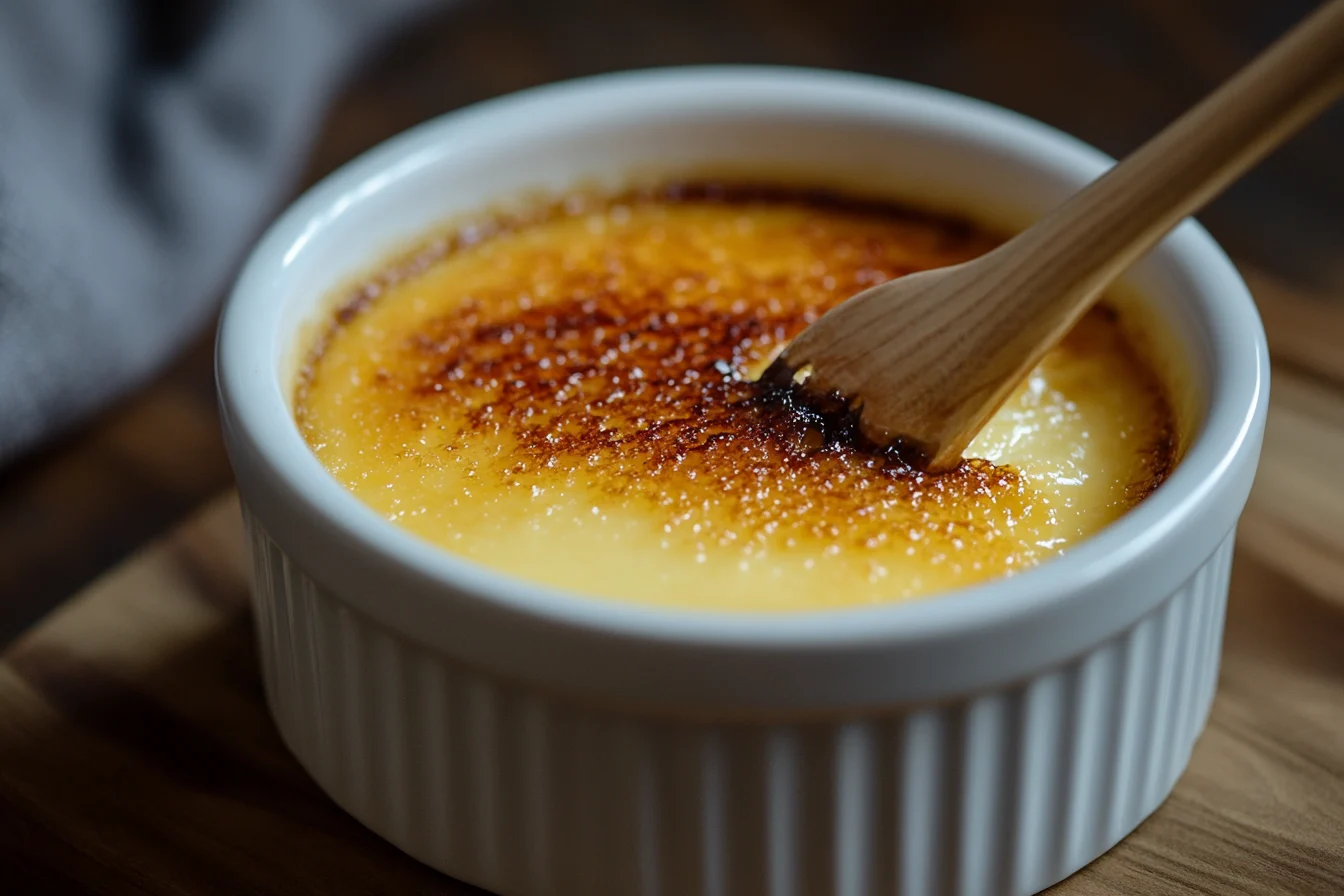
Caramelizing the Sugar Topping
Now for the grand finale: the caramelized sugar topping. Here’s how to achieve that signature crackly crust:
- Add sugar: Just before serving, sprinkle about 1–2 teaspoons of sugar evenly over each custard.
- Use a torch: Hold a kitchen torch about 2 inches from the surface and move it in circular motions. Watch as the sugar melts, bubbles, and transforms into a golden crust. Don’t stay in one spot too long, or the sugar will burn.
- Cool briefly: Let the caramelized topping cool for 1–2 minutes before serving. This allows the sugar to harden, creating that iconic crunch.
If you don’t have a torch, you can use your oven’s broiler. Place the ramekins on the top rack and broil for 1–2 minutes, keeping a close eye to prevent burning.
“The moment you hear that satisfying crack as you break the sugar crust is pure dessert magic!” ✨
Common Problems and How to Avoid Them
Even with the best intentions, things can go wrong. Here are some common issues and tips to fix them:
- Custard too runny: This usually means it wasn’t baked long enough. Next time, bake for a few extra minutes and test the custard by gently shaking the ramekin—it should jiggle slightly in the center.
- Scrambled eggs: If the custard has a grainy texture, the eggs were likely overheated during tempering. Pour the cream slowly and whisk constantly to prevent this.
- Burnt sugar: Move your torch constantly and keep it at least 2 inches away from the sugar to avoid scorching.
“Every mistake is a step toward mastery—learn from it, and your next crème brûlée will be even better!” 🥄
Quick Nutrition Overview
Here’s a recap of the nutritional content per serving (based on 6 servings):
| Nutrient | Amount |
|---|---|
| Calories | 250 |
| Fat | 20g |
| Carbohydrates | 15g |
| Protein | 4g |
With these steps, you’re on your way to creating the perfect crème brûlée. In the next part, we’ll explore creative variations, serving ideas, and how to store leftovers. Stay tuned for more sweet inspiration! 🍮
Creative Variations of Crème Brûlée
One of the best things about crème brûlée is its versatility. While the classic vanilla custard is undeniably delicious, there’s no reason you can’t get creative. Here are some unique twists to inspire your next batch:
Chocolate Crème Brûlée
If you’re a chocolate lover, this variation is for you. Simply melt 4 ounces of dark chocolate and whisk it into the warm cream before tempering the eggs. The result? A rich, velvety dessert that combines the decadence of chocolate with the elegance of crème brûlée.
“Chocolate lovers, this one’s for you—it’s like a hug in dessert form!” 🍫
Coffee or Matcha Infused Crème Brûlée
Add bold flavors to your custard by infusing it with coffee or matcha. For coffee, steep 2 tablespoons of ground coffee in the cream as it heats, then strain before mixing with the egg yolks. For matcha, whisk 1 teaspoon of matcha powder into the sugar before combining it with the yolks. These variations bring a sophisticated edge to your dessert.
Dairy-Free and Vegan Options
Crème brûlée doesn’t have to be off-limits for those avoiding dairy or animal products. Replace the heavy cream with coconut cream and swap egg yolks for a thickener like cornstarch. While the texture won’t be identical, the creamy custard flavor can still shine through.
“Who says you can’t enjoy crème brûlée on a dairy-free diet? With coconut cream, anything is possible!” 🥥
Serving and Pairing Crème Brûlée
Presentation Tips for a Restaurant-Quality Dessert
Let’s face it: we eat with our eyes first. Make your crème brûlée look as good as it tastes with these simple presentation tips:
- Garnish with fresh fruit: A few raspberries, strawberries, or blueberries add a pop of color and a touch of tartness that balances the sweetness.
- Add a sprig of mint: A small sprig of mint on top of the sugar crust can instantly elevate the look of your dessert.
- Serve on a dessert plate: Place the ramekin on a small plate with a doily or napkin underneath for an elegant touch.
“A little garnish goes a long way—dress your crème brûlée to impress!” 🎨
Beverage Pairings: Wines and Coffees
Pairing crème brûlée with the right drink can enhance its flavors. Here are some options to consider:
- Sweet dessert wines: A glass of Sauternes or Moscato complements the creamy, sweet custard beautifully.
- Espresso or cappuccino: The boldness of coffee cuts through the richness of the dessert, creating a harmonious pairing.
- Champagne: For a celebratory twist, sparkling wine adds an effervescent contrast to the creamy custard.
How to Store and Reheat Crème Brûlée
If you have leftovers (or want to prepare your crème brûlée ahead of time), proper storage is key to maintaining its texture and flavor. Follow these tips to ensure your dessert stays fresh:
Storing Crème Brûlée
- Cool completely: Allow the ramekins to cool to room temperature before covering them with plastic wrap or foil.
- Refrigerate: Store the ramekins in the refrigerator for up to 3 days. The custard will remain creamy, but wait to caramelize the sugar until just before serving.
- Avoid freezing: Freezing can alter the custard’s smooth texture, so it’s best to enjoy crème brûlée fresh.
Reheating Crème Brûlée
While the custard itself doesn’t need reheating, you’ll want to add the caramelized sugar topping just before serving. Follow these steps:
- Remove the ramekins from the refrigerator about 30 minutes before serving to take off the chill.
- Sprinkle sugar evenly on top and use a torch or broiler to caramelize the sugar layer.
- Let the sugar cool for 1–2 minutes to harden, then serve immediately.
“Freshly caramelized sugar is what takes crème brûlée from great to unforgettable!” 🔥
FAQs About Crème Brûlée
Still have questions? Here are answers to some of the most common crème brûlée inquiries:
Can I Make Crème Brûlée Without a Torch?
Yes! If you don’t have a kitchen torch, use your oven’s broiler. Place the ramekins on the top rack and broil the sugar for 1–2 minutes, keeping a close eye to prevent burning.
How Do I Know When the Custard is Fully Cooked?
The custard is done when the edges are set, but the center still jiggles slightly when shaken. It will firm up as it cools, so avoid overbaking.
How Far in Advance Can Crème Brûlée Be Prepared?
You can prepare the custard up to 2 days in advance. Just refrigerate the ramekins after baking and caramelize the sugar topping right before serving.
Conclusion: Mastering the Secret of Crème Brûlée
The secret to crème brûlée lies in its simplicity and balance. With just a handful of ingredients and a few careful techniques, you can create a dessert that feels both luxurious and approachable. From the creamy custard to the satisfying crack of the sugar crust, every bite is a testament to the magic of this classic French treat.
“Crème brûlée is more than just a dessert—it’s an experience. And now, you’re ready to create it!” ✨
So grab your ramekins, roll up your sleeves, and start whisking. Your perfect crème brûlée is just a few steps away. Bon appétit! 🍮